SL2610 Build and Flash with CLI
This document provides concise, CLI-only steps to build and flash SL2610 applications.
Throughout this guide, <sdk-root> refers to the directory where you extracted or cloned the SDK.
Table of Contents
Prerequisites
SL2610 RDK connected with 5V USB-C power (PWR_IN) and USB 2.0 OTG to the host.
Ensure hardware connections are set up per the SL2610 Platform Guide.
CLI environment, toolchains, and Python tools installed. See Setup and Install SDK using CLI.
Python virtual environment activated. See Setup and Install SDK using CLI.
CLI Flow (Build + Image Generation + Flash)
Build the System Manager and bootloader (SDK build + image assets):
cd <sdk-root>/examples/system_manager
export SRSDK_DIR=<sdk-root>
make sl2610_rdk_system_manager_defconfig BUILD=SRSDK

cd <sdk-root>
make sl2610_bootloader_rdk_defconfig BOARD=SL2610_RDK
make astrasdk
The first command builds the System Manager using the SDK build system.
The second pair builds the bootloader needed for USB boot and image packaging.
Generate MCU sub-images using the SDK image generator (run from
<sdk-root>/examples/<example_type>/<app>):Before running
make imagegen, ensure the bootloader is built:cd <sdk-root> make sl2610_bootloader_rdk_defconfig BOARD=SL2610_RDK make astrasdk
cd <sdk-root>/examples/<example_type>/<app>
make imagegen
Expected outputs:
System Manager sub-image (for
run-sm, uncompressed):<sdk-root>/examples/<example_type>/<app>/out/image/eMMCimg/sysmgr.subimg.gzCompressed sub-images (for eMMC packaging, includes
sysmgr.subimg.gz):<sdk-root>/examples/<example_type>/<app>/out/image/eMMCimg/USB boot inputs (SPK/keys/bootloader):
<sdk-root>/examples/<example_type>/<app>/out/image/usb_boot/
If you see permission errors on Linux/macOS, run:
cd <sdk-root>/examples
chmod +x tools/scripts/image/bin/gen*
Flash with the USB boot tool (SDK USB boot utility):
Enter USB boot mode first:
Press and hold USB_BOOT, then press RESET.
Release RESET, then release USB_BOOT.
There are two supported modes of flashing
Flash Entire eMMC Folder
Flash System Manager Sub-Image
Flash Entire eMMC Folder
cd <sdk-root>/tools/usb_boot_python_tool/USB_BOOT_TOOL
python usb_boot_tool.py --op run-sm \
  --sm <sdk-root>/examples/<example_type>/<app>/out/image/eMMCimg/sysmgr.subimg.gz \
  --spk <sdk-root>/examples/<example_type>/<app>/out/image/usb_boot/spk.bin \
  --keys <sdk-root>/examples/<example_type>/<app>/out/image/usb_boot/key.bin \
  --m52bl <sdk-root>/examples/<example_type>/<app>/out/image/usb_boot/m52bl.bin

# For full eMMC flashing, use a Yocto-generated eMMCimg folder (see Notes).
python usb_boot_tool.py --op emmc --img-dir <path-to-eMMCimg>
Flash System Manager Sub-Image
python usb_boot_tool.py --op emmc-sm \
  --sm <sdk-root>/examples/<example_type>/<app>/out/image/eMMCimg/sysmgr.subimg.gz \
  --sm-image <sdk-root>/examples/<example_type>/<app>/out/image/eMMCimg/sysmgr.subimg.gz
WSL USB Flashing Flow (usbipd)
Use this flow when flashing from WSL (Windows Subsystem for Linux). It uses usbipd to forward SL2610 USB CDC interfaces from Windows into WSL.
CDC VID:PID Reference
Stage |
VID |
PID |
Description |
|---|---|---|---|
Initial Boot & BL Flash |
|
|
Device in bootloader mode (used for SPK, BL, keys upload) |
After SM Flash |
|
|
System Manager (SM) is running |
Workflow Overview
[Device in BL mode]
       │
       ▼
 Step 1: Bind & Attach 0x06CB:0x019E  (Admin Windows Terminal)
       │
       ▼
 Step 2: Flash SPK  →  python usb_boot_tool.py --op run-spk
       │
       ▼
 Step 3: Device re-enumerates as 0x06CB:0x019E (M52BL CDC)
         Bind & Attach again
       │
       ▼
 Step 4: Flash SM   →  python usb_boot_tool.py --op run-sm --sm <path>
       │
       ▼
 Step 5: Device re-enumerates as 0xCAFE:0x4002 (SM CDC)
         Bind & Attach
       │
       ▼
 Step 6: Flash eMMC →  python usb_boot_tool.py --op emmc --img-dir <path>
Flashing steps (WSL)
Identify the USB device (BL Flash CDC) in an Administrator Windows terminal:
usbipd list
Find VID:PID
06CB:019Eand note itsBUSID(for example2-4).Bind and attach the BL CDC:
# Admin Windows terminal
usbipd bind --busid <bus_id> --force

# Second Windows terminal (non-admin)
usbipd attach --wsl --busid <bus_id>
In WSL, verify USB and flash SPK:
lsusb | grep "06cb"
cd <sdk-root>/tools/usb_boot_python_tool/USB_BOOT_TOOL
python usb_boot_tool.py --op run-spk
Re-bind and re-attach after re-enumeration (still
06CB:019E):# Admin Windows terminal usbipd bind --busid <bus_id> --force # Second Windows terminal (non-admin) usbipd attach --wsl --busid <bus_id>
If
BUSIDchanged after re-enumeration, runusbipd listagain and use the new value.In WSL, flash System Manager:
python usb_boot_tool.py --op run-sm --sm <sdk-root>/examples/<example_type>/<app>/out/image/eMMCimg/sysmgr.subimg.gz
Bind and attach SM CDC (
CAFE:4002):# Admin Windows terminal usbipd list usbipd bind --busid <new_bus_id> --force # Second Windows terminal (non-admin) usbipd attach --wsl --busid <new_bus_id>
In WSL, flash eMMC:
python usb_boot_tool.py --op emmc --img-dir <path-to-eMMCimg>
Tip: If flashing does not start after running a command, unplug and replug the USB cable, then re-run
usbipd list/bind/attachand retry.
Quick Reference (WSL)
# [Admin Windows terminal]
usbipd list
usbipd bind --busid <bus_id> --force
# [Second Windows terminal]
usbipd attach --wsl --busid <bus_id>
# [WSL terminal]
cd <sdk-root>/tools/usb_boot_python_tool/USB_BOOT_TOOL
python usb_boot_tool.py --op run-spk
python usb_boot_tool.py --op run-sm --sm <sdk-root>/examples/<example_type>/<app>/out/image/eMMCimg/sysmgr.subimg.gz
python usb_boot_tool.py --op emmc --img-dir <path-to-eMMCimg>
Debugging (SL2610)
This section outlines a manual, step-by-step workflow to load the bootloader and connect a debugger for the SL2610 device using OpenOCD and GDB.
Note: Debugging is not yet integrated into the VS Code extension for SL2610. Use these manual CLI steps in the meantime.
Prerequisites
OpenOCD installed and available in
PATHARM GNU toolchain installed and available in
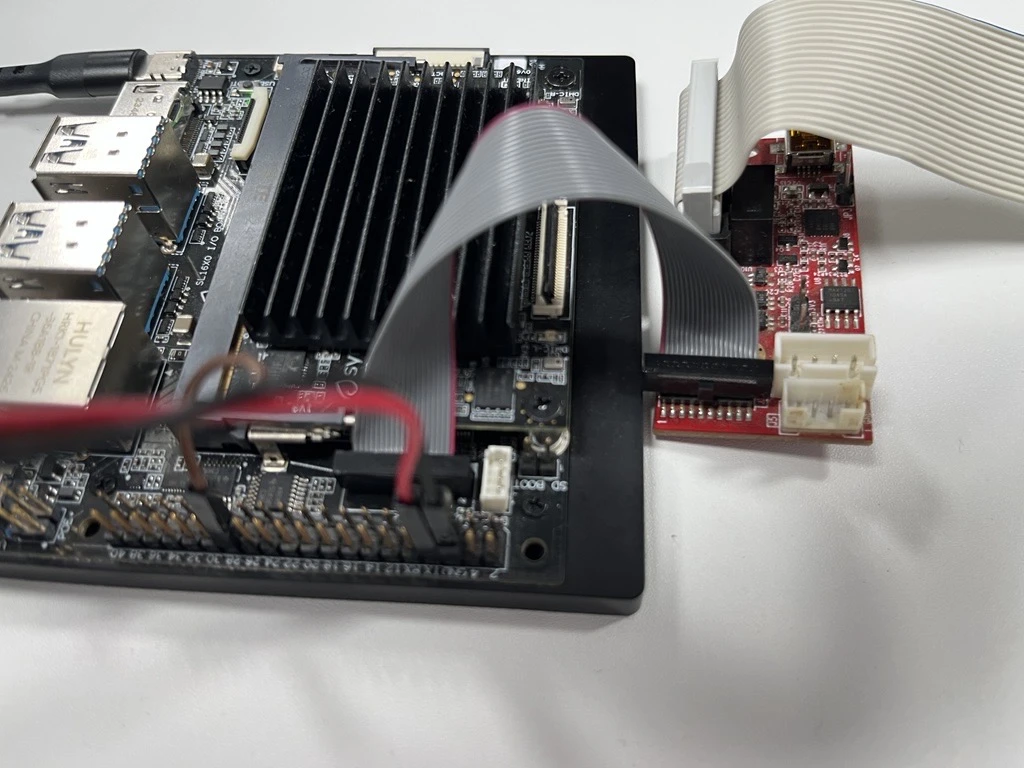
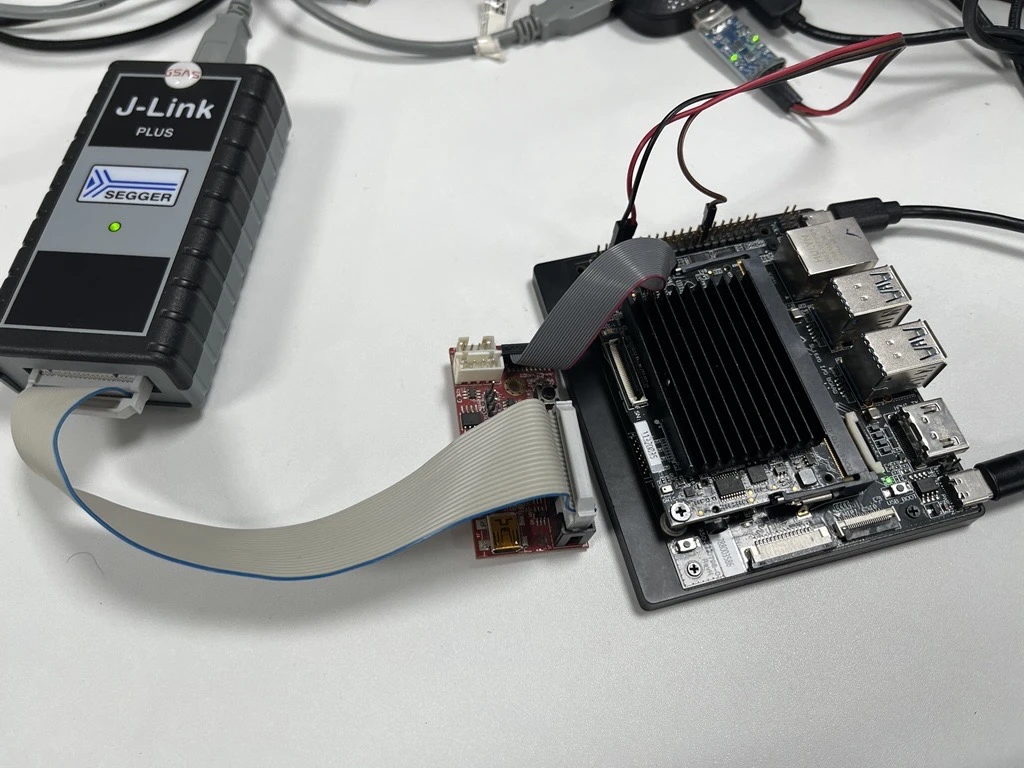
PATHSL2610 board with a J-Link connection
J-Link Connection
1) Build the Bootloader
From the <sdk-root> folder, build the bootloader as outlined in CLI Flow (Build + Image Generation + Flash). After a successful build, you should see:
Output file:
sl2610_bootloader.elfLocation:
out/sl2610_bootloader/release
2) Build a Sample App + Generate Image
Build any sample application in release mode, then run make imagegen. Detailed steps for image generation are outlined in CLI Flow (Build + Image Generation + Flash).
On completion, you should get:
m52bl.binatout/image/usb_boot/m52bl.bin
Copy the full path to m52bl.bin for the next step.
3) Run USB Boot Tool
Change directory to the USB boot tool folder:
cd .\tools\usb_boot_python_tool\USB_BOOT_TOOL\
Make sure:
The device is connected
The device is in USB boot mode (long press USB boot button, press reset, then release)
4) Load SPK + Bootloader
Run the USB boot tool command:
python usb_boot_tool.py --op run-spk --spk spk.bin --m52bl <paste the m52bl.bin path>
Expected output example:
Auto-detecting VID:0x06CB, PID:0x019E serial port...
Syna USB CDC port detected: COM88
 ✔  key.bin UPLOADED (0.18s @ 0.15MB/s)
 ✔  spk.bin UPLOADED (0.18s @ 0.12MB/s)
 ✔  m52bl.bin UPLOADED (0.11s @ 0.78MB/s)
5) Start OpenOCD
Open another terminal and run:
openocd -f tools/openocd/configs/Klamath_Jlink.cfg
Expected output example:
xPack Open On-Chip Debugger 0.12.0+dev-01685-gb9224c0c0-dirty (2024-08-02-19:51)
Licensed under GNU GPL v2
For bug reports, read
        http://openocd.org/doc/doxygen/bugs.html
Info : Listening on port 6666 for tcl connections
Info : Listening on port 4444 for telnet connections
Warn : Failed to retrieve serial number: LIBUSB_ERROR_TIMEOUT
Info : J-Link V12 compiled Feb 20 2025 16:24:27
Info : Hardware version: 12.00
Info : VTarget = 1.799 V
Info : clock speed 1000 kHz
Info : JTAG tap: nexus.m52 tap/device found: 0x4ba06477 (mfg: 0x23b (ARM Ltd), part: 0xba06, ver: 0x4)
Info : JTAG tap: soc.ca55 tap/device found: 0x4ba06477 (mfg: 0x23b (ARM Ltd), part: 0xba06, ver: 0x4)
Info : [m52] Cortex-M52 r0p2 processor detected
Info : [m52] target has 8 breakpoints, 8 watchpoints
Info : [m52] Examination succeed
Info : [m52] starting gdb server on 3333
Info : Listening on port 3333 for gdb connections
6) Connect with GDB
Once you see the “Listening on port 3333” log, open another terminal and run:
arm-none-eabi-gdb
Then run the following command inside GDB:
target extended-remote: 3333
file <path_to_debug_elf_file>
monitor reset init
monitor halt
load
set breakpoint auto-hw on
monitor arm semihosting enable
hbreak main
continue
step
Note: Keep the OpenOCD terminal running while you use GDB. If GDB fails to connect, confirm OpenOCD is still listening on port 3333.
Notes
Use
--op run-smto program only the System Manager sub-image.--op emmcrequires aneMMCimgfolder that includesemmc_part_listandemmc_image_list. These are generated by Yocto when you build the full Astra image.For SM-to-eMMC flashing (
--op emmc-sm), ensureemmc_image_listis present in theeMMCimgfolder.Yocto is only required if you need a full Linux/eMMC image; MCU image generation is handled entirely by the SDK tools above.
If
run-smfails because SM CDC is already running, power-cycle the board and try again.usbipd bindmust be run in an Administrator Windows terminal;usbipd attachcan be run in a normal Windows terminal.After flashing from WSL, unbind/detach USB forwarding in Windows if you want normal native Windows USB access.