Astra MCU SDK User Guide
Build vision and AI products on Synaptics SR‑series MCUs—fast. Astra MCU SDK brings together optimized libraries for Arm Cortex‑M55 + Ethos‑U NPU, a production‑grade build system, rich example apps, and integrated tooling to take you from first blink to deployable, secured images with minimal friction.
Why Astra MCU SDK
Optimized AI stack: prebuilt and source‑based TensorFlow Lite Micro with CMSIS‑NN optimizations, tuned for Arm Ethos‑U and M‑class cores.
Rich examples: vision, inference, audio, USB, drivers.
Out‑of‑tree examples for clean separation from SDK sources.
Production‑ready build: Kconfig + CMake + Ninja with reproducible defconfigs, fast incremental builds, and per‑app SDK caching; GCC and Arm Compiler 6 supported.
Cross‑platform tooling: first‑class Windows, Linux, macOS support.
VS Code extension: one‑click tool install, build, convert, flash, and debug.
Contents
Introduction
There are two complementary build flows in the Astra MCU SDK, and you can run either from the VS Code extension or from the native command line.
SDK Package (BUILD=SRSDK)
Where: run in the SDK root directory.
What: builds the core SDK (drivers, os, soc, utilities, AI, etc.) and installs a versioned package into
examples/install/<BOARD>/(headers, libs, toolchain CMake files, config header).When: use this to produce or refresh the SDK package that example applications link against.
Example + SDK (Combined) or Example‑Only
Where: run in the
examples/directory.Combined build: apply the application defconfig and build SDK + app in one pass with
BUILD=SRSDK(requiresSRSDK_DIRto point to the SDK root). Useful when you want the SDK tailored to the app’s configuration.Example‑only build: fast app rebuild using the already installed SDK package (
BUILD=EXAMPLE, default). Useful for edit‑compile‑run cycles.
Tools: VS Code vs Native CLI
VS Code Extension: “Build and Deploy” provides Build (SDK + App) vs Build App, plus Image Conversion and Image Flashing.
Native CLI: GNU Make + CMake + Ninja with Kconfig‐based configuration. Use the SDK root for SDK/bootloader/TFLite builds, and
examples/for application builds.
Outputs at a glance
SDK package:
examples/install/<BOARD>/App binaries:
examples/out/<target>/<build_type>/<target>.elf|.axfImage generator:
examples/out/bin_files/Output/B0_Flash/
Note:
The examples folder does not need to live inside the SDK directory. You can keep examples in a separate repo/folder.
Where the SDK package installs depends on where you run
make astrasdk BOARD=<BOARD>:From the SDK root: installs under
<sdk-root>/examples/install/<BOARD>.From your examples folder (with
SRSDK_DIRpointing to the SDK): installs under<examples-root>/install/<BOARD>.
Environment & toolchains
Set
SRSDK_DIRto the SDK root for combined builds and advanced configuration.Choose one compiler:
GCC_TOOLCHAIN_13_2_1(GCC) orAC6_TOOLCHAIN_6_19_0(Arm Compiler 6).
Quick Start (VS Code)
Prerequisites:
Windows, Linux, or macOS
VS Code (on PATH)
Astra Machina Micro (SR110 RDK) hardware
Install the VS Code extension
In a VS Code terminal:
code --install-extension <path-to-sdk>/tools/Astra_MCU_SDK_vscode_extension-1.2.3.vsixRestart VS Code
Install required tools
Open the Synaptics extension:

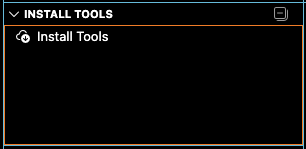
Navigate to Install Tools and follow prompts:
Restart VS Code
Connect hardware
Connect Debug IC USB (J14) on Astra Machina Micro to host PC.
Confirm default jumpers/switches (see board manual).
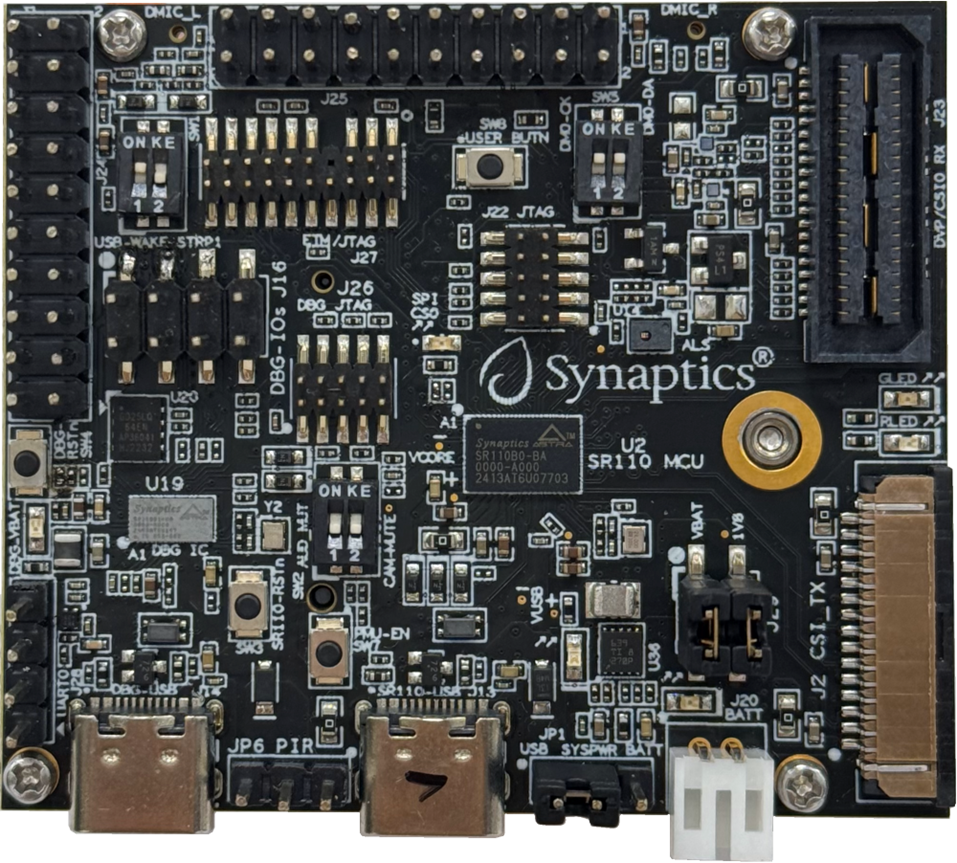
Figure 1. SR110 RDK Board
Import examples folder
In the extension, Import SDK → select the
examplesfolder in your SDK.

Note: The first time clicking on Build and Deploy the tool will ask you to provide the path the SDK root directory
Update Debug IC firmware (recommended):
In the Synaptics extension, go to IMPORTED REPOS → Build and Deploy → Image Flashing
Under Interface, choose Advanced Options → “FW Update (Debug IC)”
Select the Debug IC COM port (two CDC ports usually appear; try the other if flashing fails).
Linux note: ports appear as
/dev/ttyACM0,/dev/ttyACM1, etc.
Browse to
tools/Debug_IC_FW/Debug_IC_FW.binClick Run and confirm the warning dialog; when finished, unplug and replug the USB cable.
Build example
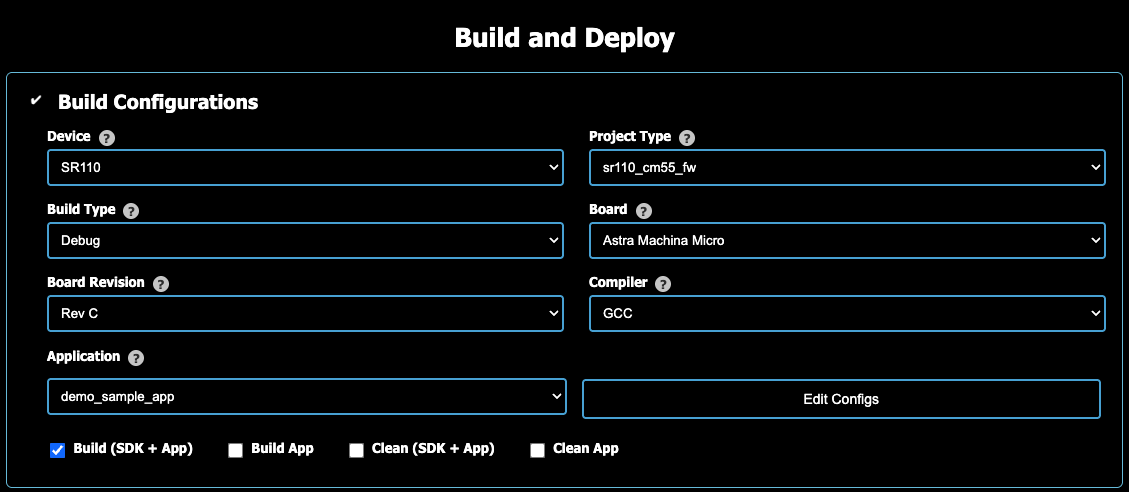
Go to IMPORTED REPOS → Build and Deploy → Build Configurations.
Select: Device:
SR110, Project Type:sr110_cm55_fw, Build Type:DebugorRelease, Board:Astra Machina Micro, Board Revision:Rev C, Compiler:GCC, Application:demo_sample_app.Enable
Build (SDK + App)Click Run (scroll to bottom of page).
Create binary file for flashing
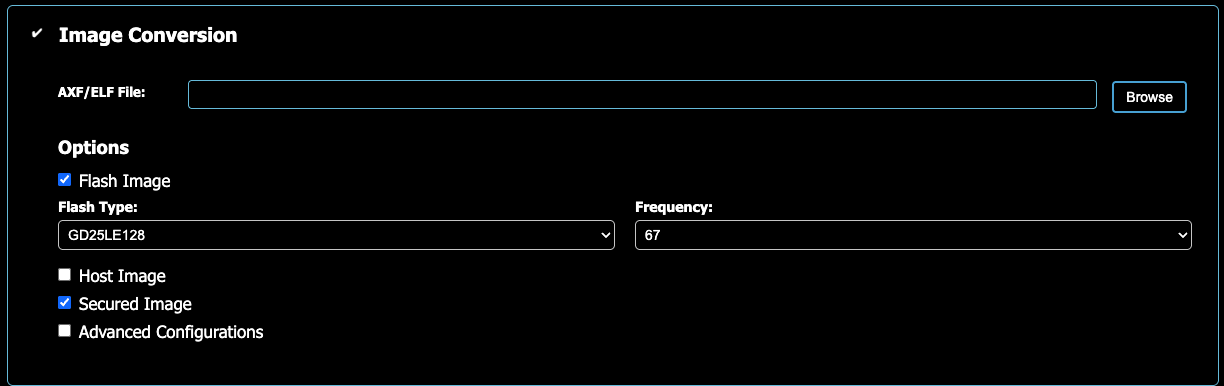
Image Conversion: the AXF/ELF was created in the previous step and is found in
examples/out/sr110_cm55_fw/<type>/.Choose Flash Image, GD25LE128, Secured Image
Run (Scroll to bottom)
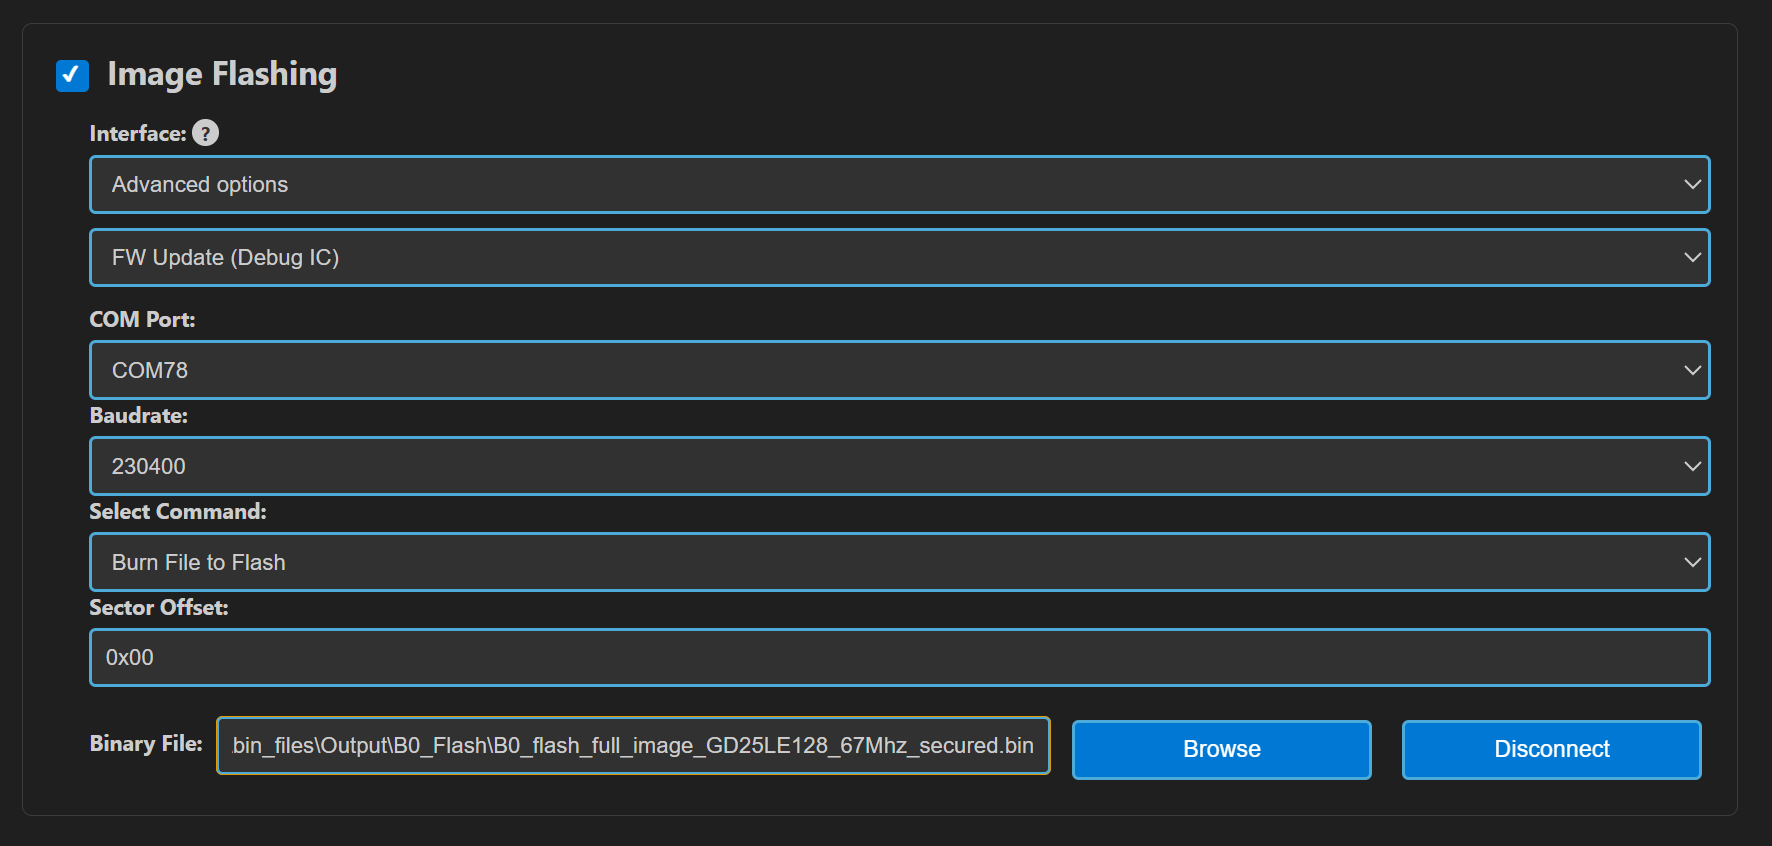
Flash binary file to onboard flash memory
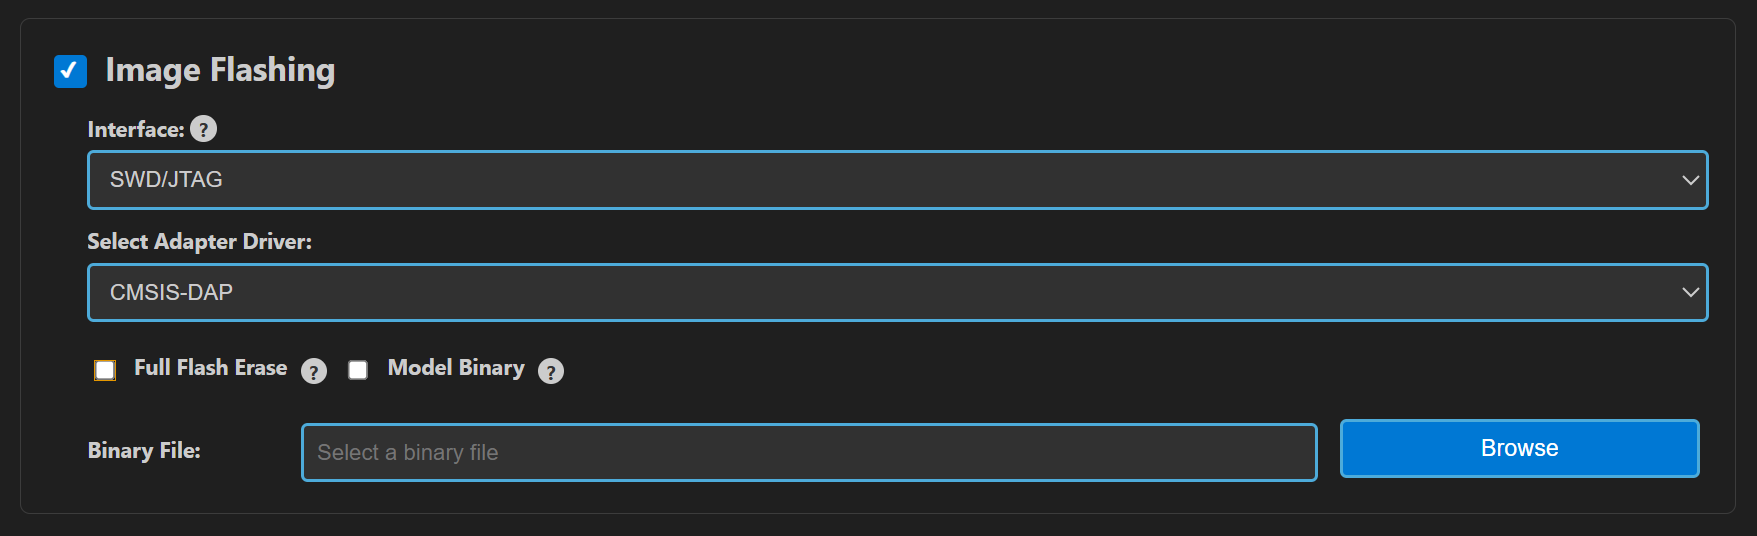
Image Flashing: Interface
SWD/JTAG, AdapterCMSIS-DAP, select the .bin generated in previous step atexamples/out/bin_files/Output/B0_Flash/B0_flash_full_image_GD25LE128_67Mhz_secured.binRun (Scroll to bottom).
NOTE: All the above steps can be done together by selecting all three checkboxes at the same time. In this case the .AXF/.ELF and .bin files are automatically populated.
Run / Debug
Replug USB, open Serial Monitor, connect to the non-FW-update COM port; you should see periodic logs.
For debugging: Extension → Debug Options → select .elf, CMSIS-DAP → Download & Reset Program.
Quick Start (Native CLI)
You can build from either the SDK root (SDK, Bootloader, TFLite) or from the examples/ folder (applications). Install toolchains and set environment variables first.
Required environment variables:
SRSDK_DIR→ path to SDK root (for advanced/combined builds)One toolchain:
GCC:
GCC_TOOLCHAIN_13_2_1=/path/to/gcc-arm-none-eabi/binAC6:
AC6_TOOLCHAIN_6_19_0=/path/to/armclang/bin
OS-specific setup guides:
Build SDK only (SDK root)
cd <sdk-root>
make default_config BOARD=SR110_RDK
make astrasdk BOARD=SR110_RDK
Installs SDK package into examples/install/SR110_RDK/ for application builds.
Note:
Running
make astrasdk BOARD=<BOARD>in the SDK root always installs to<sdk-root>/examples/install/<BOARD>.If your examples are in a different repo/folder, build from that folder instead:
cd <examples-root>;export SRSDK_DIR=<sdk-root>;make default_config BOARD=<BOARD>;make astrasdk BOARD=<BOARD>→ installs to<examples-root>/install/<BOARD>.
Build example application (examples/)
cd <sdk-root>/examples
export SRSDK_DIR=<sdk-root>
# Combined build (SDK + App) from source
make cm55_demo_sample_app_defconfig BOARD=SR110_RDK BUILD=SRSDK

# Faster rebuilds (App only, uses installed SDK)
make build BOARD=SR110_RDK
Note:
Your examples folder can live outside the SDK repository. In that case:
cd <examples-root>and setexport SRSDK_DIR=<sdk-root>.Run the same commands (e.g.,
make <app>_defconfig BOARD=... BUILD=SRSDKormake build BOARD=...).SDK installation will go to
<examples-root>/install/<BOARD>when you runmake astrasdk BOARD=<BOARD>from your examples folder.
Python environment for image generation (one‑time)
The image generator requires Python 3.13 and the
pycryptodomepackage.Create your own venv and install requirements:
macOS/Linux:
python3 -m venv .venvsource .venv/bin/activatepip install -r tools/srsdk_image_generator/requirements.txt
Windows (PowerShell):
python -m venv .venv.\.venv\\Scripts\\Activate.ps1pip install -r tools\\srsdk_image_generator\\requirements.txt
Generate flash/host images
cd <sdk-root>
python tools/srsdk_image_generator/srsdk_image_generator.py \
  -B0 -flash_image -sdk_secured \
  -spk tools/srsdk_image_generator/B0_Input_examples/spk_rc3_0_secure_otpk_0605.bin \
  -apbl tools/srsdk_image_generator/B0_Input_examples/sr100_b0_bootloader_ver_0x012F_ASIC.axf \
  -m55_image examples/out/sr110_cm55_fw/release/sr110_cm55_fw.elf \
  -flash_type GD25LE128 -flash_freq 67
Outputs to examples/out/bin_files/Output/B0_Flash/
Flash binary onto onboard flash
Open OpenOCD client:
   cd <sdk-root>
   openocd -f tools/openocd/configs/cmsis-dap.cfg -f tools/openocd/configs/target.cfg
In a separate terminal:
   cd <sdk-root>
   python tools/openocd/scripts/openocd_flash.py \
     examples/out/bin_files/Output/B0_Flash/B0_flash_full_image_GD25LE128_67Mhz_secured.bin \
     0x0 \
     0x0 \
     1
Build Architecture
Configuration: Kconfig-based, editable via
make menuconfig(examples) or advanced menuconfig when building SDK + app withSRSDK_DIRset.Generators: CMake + Ninja.
Two Modes:
BUILD=SRSDK: build and install SDK package (libraries, headers, toolchain cmake files, config header) intoexamples/install/<BOARD>/.BUILD=EXAMPLE: build only the application, linking against the installed SDK package.
Entry points:
SDK root: build SDK, bootloader, TFLite.
examples/: build examples; can optionally embed SDK build once when prebuilts are missing.
Note
The examples folder can live outside the SDK directory.
The SDK install destination depends on where you run
make astrasdk BOARD=<BOARD>:From SDK root →
<sdk-root>/examples/install/<BOARD>.From examples root (with
SRSDK_DIR=<sdk-root>) →<examples-root>/install/<BOARD>.
Artifacts
SDK install:
examples/install/<BOARD>/Application outputs:
examples/out/<target>/<build_type>/<target>.elf|.axfImage generator outputs:
examples/out/bin_files/Output/B0_Flash/
Build Recipes
SDK only (root)
make default_config BOARD=SR110_RDK
make astrasdk BOARD=SR110_RDK
Note: Install location depends on where you run the command; see the Build Architecture note above.
Example app (examples)
# Build SDK + App from source
make <app_defconfig> BOARD=SR110_RDK BUILD=SRSDK

# Edit before building
make <app_defconfig> BOARD=SR110_RDK BUILD=SRSDK EDIT=1

# Rebuild app only
make build BOARD=SR110_RDK

# List defconfigs
make list_defconfigs BOARD=SR110_RDK
Editing configuration
One-shot edit + build:
EDIT=1with<app_defconfig>opens the advanced Kconfig UI first, then proceeds to build (SDK + app ifBUILD=SRSDK, app-only otherwise). RequiresSRSDK_DIRto point to the SDK root.Edit only (no build):
make advanced_menuconfig BOARD=SR110_RDKopens the advanced Kconfig UI sourced from the SDK (requiresSRSDK_DIR), then you can build later withmake build.Examples-local edit:
make menuconfigopens the examples tree’s Kconfig (does not requireSRSDK_DIR) and updates.configfor subsequent builds.
Bootloader / TFLite (sdk-root)
# Bootloader
make cm55_sr110_bootloader_defconfig BOARD=SR110_RDK
make build

# TFLite
make cm55_tflite_micro_defconfig BOARD=SR110_RDK
make build
Activate python Virtual Environment
Important: Make sure to activate the Python virtual environment before running the image generation or flashing scripts.
Refer to Astra_MCU_SDK_Install_and_Setup for python installation.
Windows PowerShell:
'C:\Users\<Username>\.sdk_venv\Scripts\Activate.ps1'
Linux
source /home/<username>/.sdk_venv/bin/activate
macOS
source /Users/<username>/.sdk_venv/bin/activate
Image Generation & Flashing
Note : The image generator relies on the ARM GNU Toolchain for image conversion. Ensure that its path is added to the environment before running the image generator script.
Windows PowerShell:
$env:GCC_TOOLCHAIN_13_2_1:"/path/to/gcc-arm-none-eabi"
Linux
export PATH=$PATH:/path/to/gcc-arm-none-eabi/bin
export GCC_TOOLCHAIN_13_2_1=/path/to/gcc-arm-none-eabi/bin
macOS
export PATH=$PATH:/path/to/gcc-arm-none-eabi/bin
export GCC_TOOLCHAIN_13_2_1=/path/to/gcc-arm-none-eabi/bin
Tool location: tools/srsdk_image_generator/srsdk_image_generator.py
Flash Image (B0, secured)
cd <sdk-root/tools/srsdk_image_generator>
python srsdk_image_generator.py -B0 -flash_image -sdk_secured -spk ./B0_Input_examples/spk_rc3_0_secure_otpk_0605.bin -apbl ./B0_Input_examples/sr100_b0_bootloader_ver_0x012F_ASIC.axf -m55_image ../../examples/out/<target>/<type>/<target>.elf -flash_type GD25LE128 -flash_freq 67
Host Image
cd <sdk-root/tools/srsdk_image_generator>
python srsdk_image_generator.py -B0 -host_image -sdk_secured -spk ./B0_Input_examples/spk_rc3_0_secure_otpk_0605.bin -apbl ./B0_Input_examples/sr100_b0_bootloader_ver_0x012F_ASIC.axf -m55_image ../../examples/out/<target>/<type>/<target>.elf
Defaults
SPK/APBL defaults are available under
tools/srsdk_image_generator/B0_Input_examples/.Common flash types:
GD25LE128, SPI clocks:34,67,100,134MHz.
VS Code: Use Import SDK → Build and Deploy → Image Conversion and Image Flashing.
Flashing via Native CLI (OpenOCD)
Use OpenOCD to program the generated flash image into the external flash over SWD using CMSIS‑DAP or J‑Link.
Prerequisites
Install OpenOCD (e.g.,
brew install openocdon macOS, package manager on Linux, Windows binaries).Requires Python 3.13 ,
pexpectandtelnetlib.Connect the board’s Debug IC USB (CMSIS‑DAP, J14) or a J‑Link to your host.
Start OpenOCD server
cd <sdk-root>

# CMSIS-DAP (default)
openocd -f tools/openocd/configs/cmsis-dap.cfg -f tools/openocd/configs/target.cfg

# Or J-Link
# openocd -f tools/openocd/configs/jlink.cfg -f tools/openocd/configs/target.cfg
Flash the full B0 image
In a separate terminal:
   cd <sdk-root>
  python tools/openocd/scripts/openocd_flash.py .//tools//srsdk_image_generator//Output//B0_Flash//B0_flash_full_image_GD25LE128_67Mhz_secured.bin 0x0 0x0 1
Arguments:
<image_flash.bin>: path to the generated full flash image<file_offset>: usually0x0<flash_offset>: usually0x0(start of external flash)<full_flash_erase>:1to erase required region before flashing (0to skip)
Power cycle the board
Unplug and replug USB or press reset; app should run and print logs over the non‑FW‑update COM port.
Notes
If the script cannot connect, ensure OpenOCD is running (telnet on port 4444) and the selected adapter config matches your hardware.
On Linux, you may need udev rules or run with appropriate permissions for HID/USB devices.
Python compatibility: the helper script
tools/openocd/scripts/openocd_flash.pyuses Python’stelnetlib, which is removed in Python 3.13. Use Python 3.12 or earlier.
Running Image Examples
Some examples (e.g., vision pipelines) stream images or data over USB CDC. After flashing your application:
Connect the second USB port (J13) on the Astra Machina Micro for streaming.
Follow example‑specific README instructions under the chosen application’s README.
Windows Drivers (Zadig)
On Windows, to enable image streaming over USB CDC, install the WinUSB driver for the appropriate interface using Zadig.
Download Zadig
Get the utility from: https://zadig.akeo.ie/
Launch Zadig
Run
zadig-2.8.exe(or latest).
List all devices
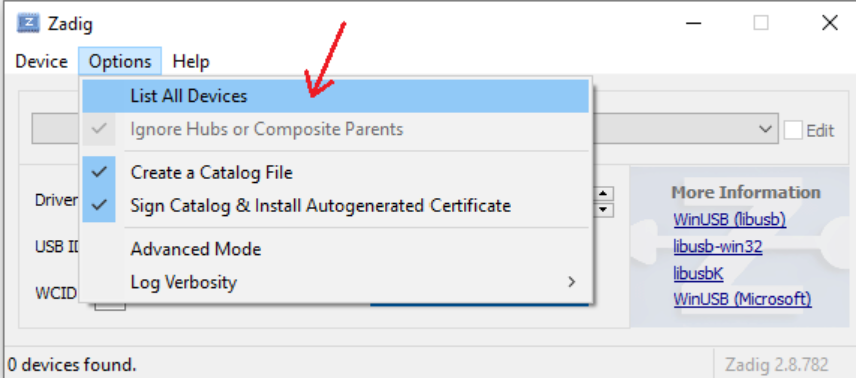
From the Options menu, select “List All Devices”.
Select the correct device
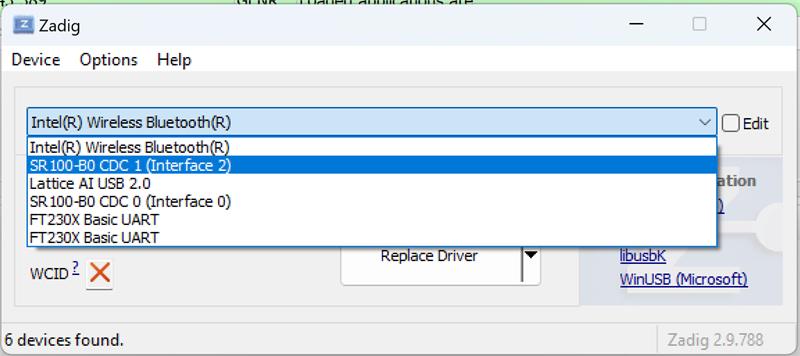
In the device drop‑down, choose “SR 100-B0 CDC 1”.
Install/replace the driver
Choose “WinUSB” as the driver and click “Replace Driver”.
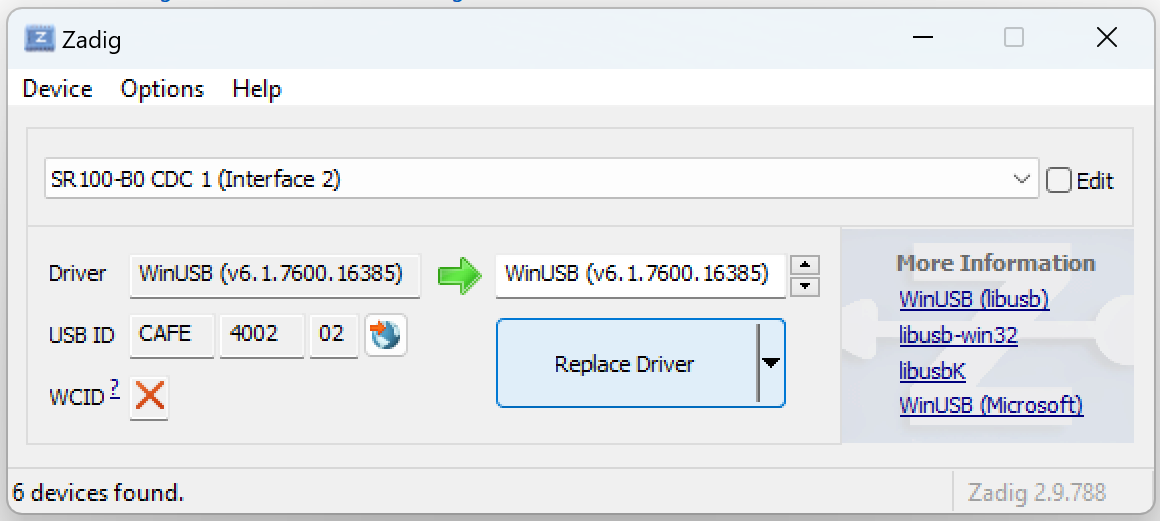
After installation, reconnect the board if needed and verify that the streaming application can communicate over the updated interface.
Debugging
Connect CMSIS-DAP via Debug IC USB.
VS Code extension → Debug Options → select application
.elf→ CMSIS-DAP → Download & Reset Program.Serial logs over the non-FW-update COM port (Windows) or
/dev/ttyACM*(Linux).
Troubleshooting
“SRSDK_DIR is not set” → export
SRSDK_DIR=/path/to/SDK.“Toolchain not found” → set
GCC_TOOLCHAIN_13_2_1orAC6_TOOLCHAIN_6_19_0to the toolchain bin.Missing linker script when building examples → ensure the SDK package is installed:
make astrasdk BOARD=SR110_RDK(root).No SDK libraries → confirm
examples/install/<BOARD>/lib/has libraries; if empty, rebuild SDK.Rebuild SDK from scratch:
make clean_package BOARD=SR110_RDK(examples), thenmake astrasdk BOARD=SR110_RDK(root) ormake custom_astrasdk(examples with SRSDK_DIR).PowerShell error:
Activate.ps1 cannot be loaded because running scripts is disabled on this systemFix: Run the following command, then execute theActivate.ps1script again:powershell.exe -ExecutionPolicy Bypass
Notes
The examples build uses an app-local SDK cache for fast, reproducible builds and refreshes it automatically when SDK inputs change.
For Debug builds using TFLite, ensure TFLite is built in Debug mode in the SDK root first.